Ever since blessing us with her presence in mid February, Miss Quinny has let one thing be known: SHE IS THE BOSS. We have a high maintenance girl on our hands guys. Most days I can be found sitting in the recliner, all day long holding the Princess. I am so okay with this on most days. But, then there are the days where I have to get things done. Other than make up catchy little songs with Q's name as the chorus. So, needless to say, we were in need of something to help entertain our little lady.
We started noticing that Q loved to hold the wipe bags while getting her diaper changed, as I am sure most other babies do. My husband starting keeping an empty one around for such occasions, and then my light bulb went off. Baby. Paper. Now I'm sure I'm not the first to come up with this awesome secondary use for wipe bags we would have otherwise thrown away. But I thought I'd share with you all how I went about creating a toy at NO COST for our sweet Quinny girl.
I started by gathering supplies:
* Fabric Scraps from some Boppy Covers I had made
* The empty wipe bag
* Scissors
* My sewing machine
After I had everything together I cut the ends open on the wipe bag.
I then cut the bag at the seam on the back, to open it up completely, and lay it flat.
Next, I peeled the lid piece off the top, to reveal just wipe bag, and nothing else.
After that, I started folding.
First in half.
Then in quarters.
Next I roughly measured the piece I had, and started cutting my fabric. No need to be exact here, just wanted it to be a little bit wider on all sides, then my piece of "baby paper."
This can totally be cut with just scissors, I had my rotary cutter and mat handy, so I just used that.
After the first piece was cut, I used a super scientific method for cutting the second. I laid the first over it, and cut around. I want this piece to fray as we use it, and wash it, so there is no need for perfection here.
Now I have my two pieces, and I am ready to sew.
This next part was a little tricky. I did not want the "baby paper" to ball up and get all puffy inside this toy. So I decided to quickly sew around the edges of the plastic bag. This proved difficult, as my sewing machine didn't like it much. Take this step or leave it, it is up to you, I found it to be worth the effort of taking my machine apart a couple times.
This is what the inside looked like after finally getting my seam around most of it.
Next I laid the inside on top of the bottom piece of fabric.
Then I laid the top piece over that.
I then pinned all around, making sure to grab the paper again in some places, not all. As long as your seam hits the baby paper in some spots, it should stay in place.
After that, all that was left was a quick seam around. I chose a zigzag stitch, but that was just personal preference. Any old stitch will do.
End result:
And of course, one very happy baby! She has been laying at my feet playing with this thing, the whole time I write this blog! Mommy=1, Quinny Still= 9,999. Hey, I least I got this one win.
Hope you all enjoyed this project.This one was super quick, and very easy! If you decide to try it, leave me some pics of your creations in the comments.
FourMonsterMom (FMM) was created as a fun way for me to document the ways we organize our large family. We find with four kids so close in age, time is a hot commodity at our home. Here I will share some of the ways we stay organized, have fun, love, laugh, and live in a small home filled with tons of love.
Tuesday, August 23, 2016
Thursday, August 11, 2016
Floral Letter Initial for Baby Quinn's Room
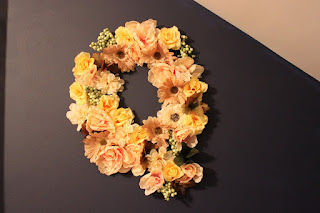
I found this floral initial on Pinterest while I was pregnant with our sweet Jacqueline Mae. (Quinn) I knew I wanted it in her room somehow, and I was determined to make that happen. However, after seeing the price tag, (uhhemm $150) I was less into it. So here is how I did it myself, and made it look better. (My opinion of course)
First off, let me just start by saying if you're a Hobby Lobby freak like myself, and can't imagine using Dollar Store items to get this look, you might as well just order the original. Even when their floral is on sale, the Lobby's stems will take this project from DIY gold, to DIY dirty penny. I found all of the flowers used in this project at my local Dollar Tree, and I am obsessed with how it turned out. Ready?
What You'll Need:
~Glue Gun
~Scissors
~Flowers
~Magnets
~Thumb Tacks
Let's Get starated!
I first picked the wall I wanted her initial to go on....
This is just to the right of her crib.
I then placed my thumb tacks in the shape of a "Q" on the wall. I am not a planning kinda gal. I like to throw darts at the wall, or in this case thumb tacks, and see how they stick. This drives my husband crazy. I do not measure. I do not level. I use my eyes. I usually end up loving it, but sometimes things roll off my shelves. Ooops.
After the Q was in place, I got to gluing.
I really believe this is just another benefit of Dollar Store flowers, I did not have to cut the blooms off the stems. No need for wire cutters, just some crummy old scissors. The flowers literally pulled right off, and all I had left to do was trim them flush, so they would adhere to a magnet easily. I then glued all my flowers to magnets, and I was ready to go.
I simply started putting the flower magnets on the tacks, and adjusted and swapped flowers as I saw fit to make this letter look good.
A little progress shot.
Little bit more added...
And the final Product.
I had to add tacks occasionally here and there to achieve the look and fullness I wanted. For instance, it was really hard to make the little stick down part of the Q stand out, so I had to add several tacks and flowers there as I went. But I think the end result was perfect for our Quinners.
This project was so super easy, and didn't take much time, or money to complete. I only spent $10 on flowers, and I have PLENTY of spares. I had magnets left over from the fridge project, so that cost me nothing, and the thumb tacks and glue were all on hand! Sure my Q is smaller, but I think it looks just as good, if not better. It also, is made to my liking, and I can switch the flowers around, or out as I see fit! Have a great week ya'll!
Friday, August 5, 2016
Make My Day!
One of the things my husband and I find hardest about raising 4 babies, is finding the time each day to make sure they get individualized attention from each of us. We've tried a few different ways of making this happen, but over time, they have all fizzled out. For awhile we would trade days and take one of the older boys with dad, and one with mom each night when my husband got home from work. My husband would take one outside, or to his shop to work on a project. I'd take the other and have them help me make dinner. The boys liked this, but once baby number 4 arrived, it somehow disappeared. The other day my second child, and the one that tends to get lost in the shuffle the most, came to me asked why we don't do this anymore. I knew then that he wasn't getting the kind of attention he needed from us. Don't get me wrong, I want to raise independent children that can keep themselves entertained, but I also don't want to look at them on their graduation day, and wonder how I missed it. How I missed them growing up. There are days where I look at my beautiful 2nd born as I put him to bed and wonder, " Did I talk to you today? Man I miss you." This is NOT okay. So here we are, planning new ways to get much needed alone time with each of our beautiful monsters.
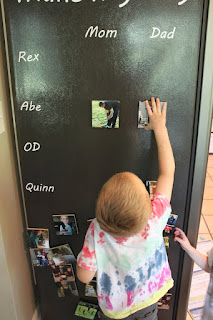
What I came up with, is the "Make My Day" chart for the barren side of our fridge. Each morning the monsters awake, and head straight for the kitchen to pick their activities for the day. They know the expectation, and so do we. Each activity gets 15 minutes. That is 30 minutes a day for each babe, 15 with mom, 15 with dad. This hardly seems like enough to me, but I promise they notice. When they're getting their own time with each of us, their behavior improves, and they appreciate things more. It's only an hour of mine and my husband's time each day, and I think that is absolutely do-able, if you prioritize your time. Our kids are gifts from God, we only get for a short time here on this Earth, and I don't want to look back 20 years from now and wish I had spent more time with them. Work CAN wait! Chores CAN wait! Your kids CAN NOT!!!!
So here is the DIY on how we accomplished this chart. Enjoy!!!
1st I started by gathering pictures from over the years of my boys enjoying their favorite activities....
Movie Night
Playing Cars With Dad
Building Legos
Playing Dress Up
Science Experiments With Dad
Cooking With Mom
You get the idea.
I then went to Walgreens, and ordered 4x4 prints of all our favorite activities. After Googling Coupon Codes, I found this one for 40% off, and got my 25 prints for only $6!!!!
2. After picking up my prints, it was time to make my magnets. Here is what you will need....
*Pictures=$6
*Homemade Mod Podge, Recipe found here=$1
*4x4 blocks of wood (Needed the hubby for this one, Mama doesn't use a table saw) Scrap=FREE
(not pictured, because I forgot: hot glue gun, and craft magnets)=$4
3. I then applied a thin layer of Mod Podge to a 4x4 block of wood. Any type of light wood would work for this. Mine was a scrap piece of plywood I had laying around.
I used Mod Podge because I didn't want glue lines that often form when using craft glue. This look could also have been accomplished with spray adhesive, but Homemade Mod Podge was much cheaper, and we do things on a budget in the FourMonster House.
4. Next apply your picture.
Lightly rub it on flat with your fingers.
5. Use your Glue Gun to adhere a magnet to the back. (I forgot to take pics of this step, whoops)
FourMonster's Grandma provided the magnets. They were $8 at Hobby Lobby, but like me, she loves her Hobby Lobby app, and used the 40% off coupon there to get them for less than $5. (I still owe her for that)
That's all for the magnets, Now for the Chart itself.....
I used my silhouette, to cut out the vinyl lettering for my chart. Since most of you probably don't have one of your own, I am not going to go too deep into that process. This could easily be done in a variety of different ways. You could make another 4x4 magnet with each kids picture on it, one of mom, and one of dad. You could purchase vinyl letters from Hobby Lobby, use a Paint Pen, or Chalk Pen, so many great ways to accomplish the same thing. I just used my Silhouette, because I love it, and happened to have it handy. ;)
With the supplies I had already, and the ones I had to buy, this project ended up only costing about $11.00! That is awesome in my book.
Here is the finished product. The kids are loving it, and I think they really dig the fact that they are in charge of designing and directing their own special time with Mom & Dad each day.
The magnets, all finished and up on the fridge.
The finished product! I love that not only is this a great way to keep our kids feeling loved, and important, but a beautiful way to display fun family memories!!
Designing their day! They have so much fun with this!!!
Thanks for stopping by, let me know what you think of this project in the comments. Also, I'd love to hear how you and your family make sure to spend quality time together each day.
Subscribe to:
Posts (Atom)